 使用tkinter模拟windows计算器程序
背景
最近用计算器比较频繁,随考虑是否可以用python做一个图形化程序,后用pyinstaller打包做成exe文件,可以在win7上直接运行。后查找资料,综合考虑后选择tkinter做图形化工具
前提条件
- python3.7环境
- win7环境
- pyinstaller打包程序
1.计算器程序设计思路
tkinter是python里自带的模块,可以直接使用
tkinter设计思路
1.创建按钮
2.按钮布局
3.逻辑函数处理
2.程序说明
# -*- coding:utf-8 -*-
from tkinter import *
root=Tk()
#主屏幕设计
screenwidth=root.winfo_screenwidth()
screenheight=root.winfo_screenheight()
x=screenwidth-400
y=screenheight-600
root.geometry("220x270+%d+%d" %(x/2,y/2))
root.resizable(0,0)
root.title("calculate")
content=""
#show函数,变化显示屏内容
def show(arg):
    global content
    content+=arg
    label["text"]=content
#eq函数,按=计算结构
def eq(arg):
    global content
    label["text"] = (content + "=\n" + str(eval(content)))
#clear函数,清空输入
def clear():
    global content
    label["text"]="0"
    content=""
#bdel函数,删除错误输入
def bdel():
    global content
    content = content[:-1]
    label["text"]=content

#display calculate value
label=Label(root,text="0",width=30,height=3,anchor=SE,relief="raised")
label.grid(row=0,columnspan=4)
#button setup
c=Button(root,text='C',width=6,height=2,command=lambda:clear())
bdel=Button(root,text='DEL',width=6,height=2,command=bdel)
bai=Button(root,text='%',width=6,height=2,command=lambda:show("%"))
div=Button(root,text='/',width=6,height=2,command=lambda:show("/"))
b7=Button(root,text='7',width=6,height=2,command=lambda:show("7"))
b8=Button(root,text='8',width=6,height=2,command=lambda:show("8"))
b9=Button(root,text='9',width=6,height=2,command=lambda:show("9"))
mul=Button(root,text='*',width=6,height=2,command=lambda:show("*"))
b4=Button(root,text='4',width=6,height=2,command=lambda:show("4"))
b5=Button(root,text='5',width=6,height=2,command=lambda:show("5"))
b6=Button(root,text='6',width=6,height=2,command=lambda:show("6"))
sub=Button(root,text='-',width=6,height=2,command=lambda:show("-"))
b1=Button(root,text='1',width=6,height=2,command=lambda:show("1"))
b2=Button(root,text='2',width=6,height=2,command=lambda:show("2"))
b3=Button(root,text='3',width=6,height=2,command=lambda:show("3"))
add=Button(root,text='+',width=6,height=2,command=lambda:show("+"))
b0=Button(root,text='0',width=14,height=2,command=lambda:show("0"))
bdot=Button(root,text='.',width=6,height=2,command=lambda:show("."))
bcal=Button(root,text='=',width=6,height=2,command=lambda:eq("="))
#各按钮在屏幕上布局
c.grid(row=1,column=0,padx=1,pady=1)
bdel.grid(row=1,column=1,padx=1,pady=1)
bai.grid(row=1,column=2,padx=1,pady=1)
div.grid(row=1,column=3,padx=1,pady=1)
b7.grid(row=2,column=0,padx=1,pady=1)
b8.grid(row=2,column=1,padx=1,pady=1)
b9.grid(row=2,column=2,padx=1,pady=1)
mul.grid(row=2,column=3,padx=1,pady=1)
b4.grid(row=3,column=0,padx=1,pady=1)
b5.grid(row=3,column=1,padx=1,pady=1)
b6.grid(row=3,column=2,padx=1,pady=1)
sub.grid(row=3,column=3,padx=1,pady=1)
b1.grid(row=4,column=0,padx=1,pady=1)
b2.grid(row=4,column=1,padx=1,pady=1)
b3.grid(row=4,column=2,padx=1,pady=1)
add.grid(row=4,column=3,padx=1,pady=1)
b0.grid(row=5,column=0,columnspan=2,padx=1,pady=1)
bdot.grid(row=5,column=2,padx=1,pady=1)
bcal.grid(row=5,column=3,padx=1,pady=1)


root.mainloop()
程序下载地址
3.安装打包工具pyinstaller
#pip3 install pyinstaller
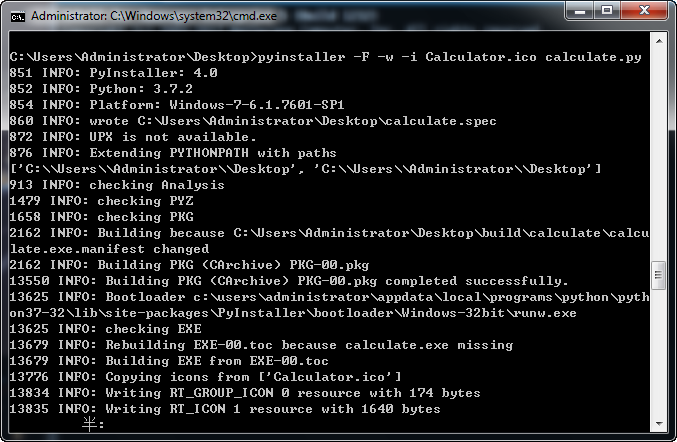
4.制作exe程序
使用pyinstaller工具制作exe程序,可直接在win7上运行,制作后exe程序在dist文件夹中
其中-w参数,是关闭cmd窗口参数,-i后添加桌面图标文件
图标文件下载地址下载
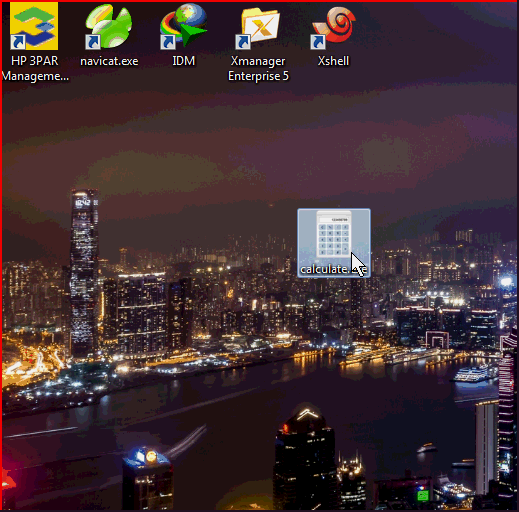
5.程序展示
声明:本博客的原创文章,都是本人平时学习所做的笔记,转载请标注出处,谢谢合作。